Before diving into the installation process, it’s important to understand why so many homeowners and businesses choose two-piece toilets. If you’re planning to learn how to install a two piece toilet, knowing the advantages of this design will help you appreciate its long-term value.
A two-piece toilet is made of two separate parts—the tank and the bowl—that are bolted together during installation. This design has remained the most common style for decades, and for good reason.
Key Benefits of a Two-Piece Toilet
-
Affordability
One of the biggest advantages is cost. Two-piece toilets are typically less expensive than one-piece models. For budget-conscious homeowners or property managers outfitting multiple bathrooms, this makes a huge difference. -
Easier Handling and Transport
Because the tank and bowl come separately, each component is lighter and easier to carry. This makes installation more manageable, especially if you need to move the toilet up stairs or into a small bathroom. -
Replacement Flexibility
With a two-piece toilet, if one part breaks, you can often replace just the tank or the bowl instead of buying a whole new unit. This saves both money and effort. -
Wide Availability
Since two-piece toilets are the industry standard, they’re available in almost every home improvement store. Whether you want a basic model or a high-efficiency, water-saving option, you’ll have plenty of choices. -
Water-Saving Options
Modern two-piece toilets now come with dual-flush or low-flow technology. Older toilets could use up to 3.5 gallons per flush, but today’s models use only 1.28–1.6 gallons, making them eco-friendly and cost-effective on water bills.
Why This Matters Before Installation
Understanding these benefits helps you see why two-piece toilets are still the go-to choice for homeowners worldwide. When you begin the steps on how to install a two piece toilet, you’ll realize the design itself makes installation less complicated than many expect.
Preparing for Installation – Tools and Materials
Before you even touch the toilet, proper preparation is key. Many homeowners who attempt DIY plumbing make the mistake of starting without the right equipment on hand, which often leads to frustration and wasted time. If you want to master how to install a two piece toilet, the first step is gathering everything you’ll need in advance. This ensures a smooth process without last-minute trips to the hardware store.
Essential Tools
These are the basic tools required for the job:
- Adjustable Wrench – For tightening bolts and nuts securely.
- Flathead and Phillips Screwdrivers – Used for mounting hardware and adjustments.
- Utility Knife – Helpful for trimming excess wax or cutting caulk.
- Hacksaw – In case you need to trim overly long closet bolts.
- Pipe Wrench – Provides extra grip for stubborn plumbing connections.
- Spirit Level – Ensures your toilet sits perfectly balanced, preventing rocking.
- Tape Measure – To double-check flange alignment and spacing.
- Work Gloves and Safety Glasses – Protection while handling porcelain and tools.
Installation Materials
Alongside tools, you’ll need certain materials that are part of the installation process:
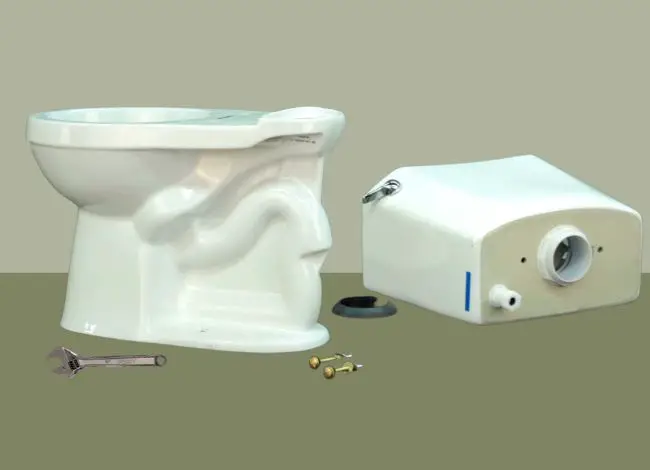
- Toilet Bowl and Tank (Two-Piece Set) – The main components of your installation.
- Wax Ring or Wax-Free Rubber Seal – Creates a watertight seal between the toilet and the flange.
- Closet Bolts and Decorative Caps – Secure the toilet to the floor and provide a finished look.
- Rubber Gaskets – Prevent leaks between the tank and the bowl.
- Tank Bolts and Washers – Hold the tank firmly in place.
- Toilet Seat – Standard, soft-close, or even bidet-compatible models.
- Flexible Water Supply Line – Connects the toilet tank to the shut-off valve.
- Shut-Off Valve (Optional) – Should be replaced if the old one is corroded or leaking.
- Caulk or Silicone Sealant – Seals the toilet base for added stability and leak protection.
💡 Pro Tip: Consider using a wax-free seal instead of a traditional wax ring. Wax seals are reliable but can be messy and difficult to adjust. Wax-free rings, on the other hand, are cleaner, easier for beginners, and often reusable if repositioning is necessary.
Step-by-Step Installation Guide
Now that you’re fully prepared with tools and materials, it’s time to move into the installation itself. This section is the heart of learning how to install a two piece toilet. Follow each step carefully, and you’ll end up with a leak-free, stable, and perfectly functioning toilet.
Step 1: Remove the Old Toilet (If Applicable)
If you’re replacing an existing toilet, removal comes first.
- Turn Off the Water Supply – Close the shut-off valve near the wall.
- Drain the Toilet – Flush once to empty the tank and bowl. Mop up leftover water with a sponge or wet/dry vacuum.
- Disconnect the Supply Line – Unscrew it from the bottom of the tank.
- Unscrew the Base Bolts – Use an adjustable wrench to loosen the closet bolts holding the toilet to the floor.
- Lift and Remove the Toilet – Rock gently to break the wax seal, then lift the toilet and set it aside.
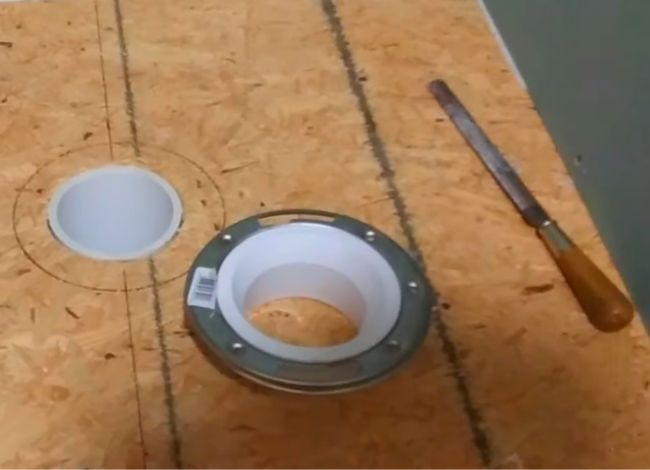
- Clean the Flange – Scrape off the old wax ring with a putty knife. Check the flange for cracks or damage. If it’s loose, repair or replace it before continuing.
💡 Pro Tip: Stuff a rag into the flange opening after removal to block sewer gases until you’re ready to install the new toilet.
Step 2: Install the Closet Bolts and Wax Ring
- Place new closet bolts into the flange slots, pointing upward.
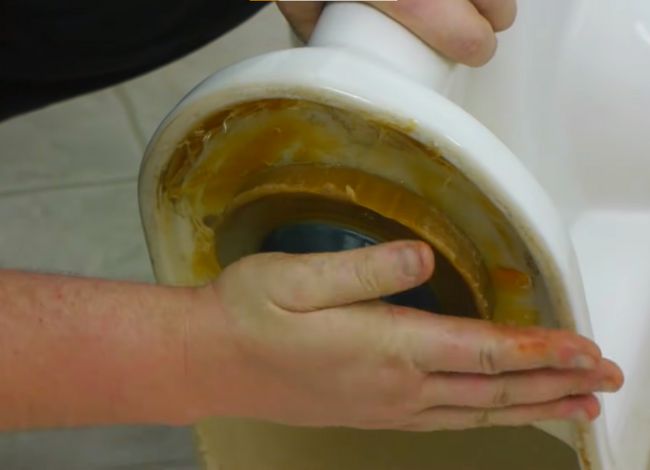
- Set the wax ring or wax-free rubber seal either on the flange or the bottom of the toilet bowl outlet (depending on manufacturer instructions).
- Make sure the ring is perfectly centered to ensure a tight seal and prevent leaks later.
Step 3: Position and Secure the Toilet Bowl
- Lift the bowl and carefully lower it straight down onto the flange, aligning the mounting holes with the bolts.
- Rock the bowl slightly to compress the wax ring and seat it firmly.
- Place washers and nuts onto the closet bolts.
- Tighten bolts gradually, alternating sides to maintain even pressure. Do not over-tighten, as this may crack the porcelain.
- Check with a spirit level to ensure the toilet bowl sits evenly.
- Snap on the decorative bolt caps for a clean look.
- Apply a thin bead of caulk around the base for stability and to block water and odor leaks.
Step 4: Assemble and Install the Toilet Tank
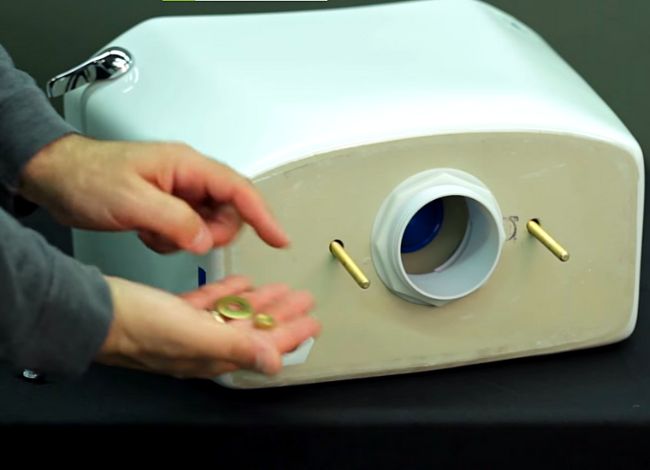
- Place the large rubber gasket over the tank’s flush valve outlet.
- Position the tank on the bowl, aligning the holes.
- Insert tank bolts with washers and secure them evenly from underneath.
- Tighten gradually, alternating sides, until the tank sits firmly without rocking.
- Check with a level to ensure proper alignment.
💡 Some modern two-piece toilets come with pre-installed internal parts (fill valve and flush valve). If not, install these components before securing the tank.
Step 5: Connect the Water Supply Line
- Connect one end of the flexible supply line to the fill valve under the tank.
- Attach the other end to the shut-off valve.
- Slowly open the shut-off valve by turning counterclockwise.
- Allow the tank to fill and check for leaks around connections. If leaks appear, gently tighten fittings.
Step 6: Install the Toilet Seat
- Place the seat over the toilet bowl, aligning the bolt holes.
- Insert bolts through the holes and tighten from underneath.
- Ensure the seat is level and doesn’t shift.
Optional: Consider installing a soft-close seat or a bidet attachment for added comfort.
Step 7: Test the Toilet
- Flush the toilet multiple times to ensure proper water flow.
- Check for leaks around the base, tank bolts, and supply line connections.
- Sit on the toilet to test stability. If it wobbles, insert plastic shims under the base and recaulk if needed.
Maintenance and Long-Term Care
Learning how to install a two piece toilet is only the beginning. Once your new toilet is securely in place, proper care and regular maintenance are crucial for keeping it in top working condition. While two-piece toilets are built to last, ignoring small issues can lead to costly repairs or premature replacement.
Regular Maintenance Tips
-
Check for Leaks Periodically
During the first week after installation, inspect the area around the base and tank for any signs of moisture. A small drip can turn into a big problem if left untreated. -
Inspect the Flapper and Fill Valve
These are the two most common parts to wear out in any toilet. A worn flapper may cause constant running water, while a faulty fill valve can lead to weak or noisy refills. Both parts are inexpensive and easy to replace. -
Clean Gently and Consistently
Use mild bathroom cleaners instead of harsh chemicals. Bleach tablets or strong acidic cleaners can corrode rubber seals and metal parts inside the tank, reducing lifespan. A soft brush and mild detergent are usually sufficient. -
Keep the Bowl and Rim Jet Clear
Over time, mineral buildup can clog rim holes and affect flushing power. Use a toilet brush or vinegar solution to remove deposits and keep the flush strong. -
Inspect the Caulk Around the Base
Caulk not only improves the appearance but also prevents water and odor leaks. Check it annually for cracks or gaps and reapply if necessary.
Long-Term Care Practices
- Flush Responsibly – Two-piece toilets are designed for human waste and toilet paper only. Flushing wipes, sanitary products, or paper towels can cause clogs.
- Avoid Over-Tightening Bolts – If adjustments are ever needed, remember that porcelain is delicate. Gentle tightening is all that’s required.
- Check Water Efficiency – If your toilet is older, consider upgrading the internal components to a dual-flush system or low-flow mechanism for better water savings.
- Winter Protection – In colder climates, if the bathroom isn’t used often, ensure the water supply line and shut-off valve are insulated to prevent freezing.
Lifespan of a Two-Piece Toilet
A high-quality two-piece toilet can last 15–20 years with proper maintenance. While the porcelain bowl itself can last much longer, internal parts like the flush valve, fill valve, and flapper may need replacing every few years. The good news is that these repairs are simple and inexpensive compared to replacing the entire toilet.
Common Mistakes to Avoid During Installation
Even after carefully studying how to install a two piece toilet, many DIYers run into avoidable problems. Small mistakes during installation can cause leaks, wobbling, or even cracks in the porcelain. Knowing what to avoid will save you time, frustration, and money in the long run.
1. Incorrect Flange Height
One of the most common mistakes is installing the toilet on a flange that’s too high or too low.
- If the flange sits too high, the toilet may rock and fail to seal properly.
- If the flange is too low, the wax ring may not compress enough to form a watertight seal.
💡 Solution: Ensure the flange is level with or slightly above the finished floor surface before setting the toilet. If needed, use flange spacers to adjust the height.
2. Reusing an Old Wax Ring
Some DIYers attempt to reuse the wax ring from their old toilet. This almost always leads to leaks.
💡 Solution: Always install a new wax ring or wax-free seal during installation. They are inexpensive and crucial for preventing sewer gas and water leaks.
3. Overtightening Tank or Bowl Bolts
Porcelain is strong but brittle. Applying too much torque on bolts can crack the bowl or tank, turning your project into a costly mistake.
💡 Solution: Hand-tighten nuts first, then use a wrench for gentle adjustments. Stop tightening as soon as the tank and bowl feel stable and no water leaks are visible.
4. Skipping the Level Check
A toilet that isn’t level may rock or shift over time. This movement can break the wax seal, causing leaks and damage to your bathroom floor.
💡 Solution: Always use a spirit level before final tightening. If the floor is uneven, use plastic shims to stabilize the base.
5. Forgetting to Test Before Caulking
Some homeowners rush to apply caulk before checking for leaks or wobbling. Once the caulk sets, adjusting the toilet becomes more difficult.
💡 Solution: Perform several test flushes, check stability, and only then apply caulk around the base.
6. Not Replacing a Faulty Shut-Off Valve
If the shut-off valve is old, rusty, or leaking, skipping its replacement can cause problems later.
💡 Solution: Inspect the shut-off valve before installation. If it’s hard to turn or shows signs of wear, replace it during the toilet installation process.
Frequently Asked Questions (FAQs)
Q1: How long does it take to install a two-piece toilet?
On average, installation takes 1.5 to 2 hours if you have the right tools ready. Beginners may take a little longer, while experienced DIYers can sometimes finish in under an hour.
Q2: Do I need a plumber, or can I do it myself?
Most homeowners can handle the project themselves. If you carefully follow the steps in this guide, you don’t need professional help. However, if you encounter damaged plumbing, cracked flanges, or complex leaks, a plumber may be necessary.
Q3: Wax ring vs. wax-free ring – which is better?
Both are effective. Wax rings are traditional, inexpensive, and reliable, but messy. Wax-free seals are cleaner, easier to adjust, and reusable in some cases. For beginners learning how to install a two piece toilet, wax-free seals are often more convenient.
Q4: Can I add a bidet seat to a two-piece toilet?
Yes. In fact, most modern bidet attachments are designed specifically for two-piece toilets. Installing one can improve hygiene and comfort without replacing the whole unit.
Q5: Is caulking around the base necessary?
While not always mandatory, caulking provides a neat finish, prevents water seepage, and stops unpleasant odors from escaping. Many local building codes also recommend it.
Q6: What should I do if the toilet rocks after installation?
Use plastic shims under the base to stabilize it. Once level, reapply caulk around the base to secure it. Never leave a rocking toilet unattended, as it can break the wax seal and cause leaks.
Final Thoughts
Installing a toilet may seem like an advanced plumbing project, but as this guide shows, learning how to install a two piece toilet is well within reach for most DIY homeowners. With the right preparation, tools, and patience, you can replace an old fixture or install a brand-new one without hiring a professional.
The advantages of a two-piece toilet—affordability, durability, ease of handling, and availability—make it a smart investment for any home or business. By following the step-by-step instructions, avoiding common mistakes, and applying simple maintenance practices, your toilet will provide reliable service for many years.
In the end, taking on this project not only saves you money but also gives you the satisfaction of completing an essential home improvement task yourself. Next time someone wonders how to install a two piece toilet, you’ll be the one with the answer—and the experience to back it up.
Hi, this is Robert Crossan, the owner of this website, has 17 years of experience in the installation, maintenance, and repair of toilets and plumbing systems. After completing the Level 2 Basic Plumbing course in 2005, I started working in both domestic and commercial buildings as a professional plumber. So I can figure out the core difference between different toilet models and brands. It also helped me monitor their work performance and setbacks.