Does your toilet bowl has a low or high water level? Check your toilet tank and adjust the toilet float. The bowl’s low or high water level is usually caused by low or high water levels in the toilet’s tank. Therefore, the first place that you should look at is the toilet and adjust the float.
Before that, you should inspect your toilet to fix it and determine if it has a defective part or if the toilet bowl is cracked. If your toilet is okay, you can easily adjust the float in the toilet bowl by following these steps:
How to correct the water level in a toilet with a ball float?
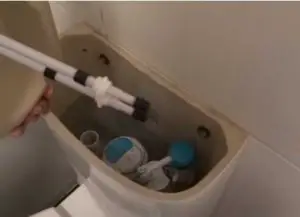
Step 1: Remove the toilet tank lid
Adjusting the float is a time-consuming task, and you have to be patient while fixing your toilet float. First, you need to determine what type of float device you have. Most toilets come with a ball float in the tank. Start by removing the toilet tank’s lid and locating the ball float. Place the toilet lid on a secure surface, such as on top of a rag or newspaper. Toilet tank lids are very delicate and should be handled with great care.
Step 2: Check the water level inside the tank
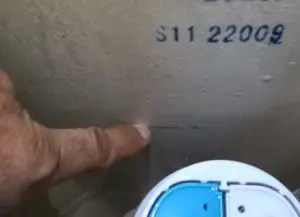
Inspect the water level inside the tank. The water should rest 1 to 2 inches below the fill valve and overflow tube. If the water is higher or lower, it may be off-balance. So you have to fix the toilet’s faulty fill valve. Besides, most toilets have a water line where the water level should be.
Step 3: Turn off the shutoff valve
If the water level inside the bowl is not okay, turn off the shutoff valve behind the toilet. Rotate the valve clockwise to lock it and flush the toilet. It helps to drain the water from the tank and bowl. After the toilet flushing, the tank will not refill, and you can now work inside the tank.

Step 4: Inspect the float and fill valve
Examine the flushing system and see what condition it’s in. If there is any damaged part, you will have to change the toilet fill valve or call a professional plumber. It may be the reason the water level in the bowl is not correct. So it’s time to adjust the water level. Identify the type of fill valve you have in your toilet. If your toilet fill valve has a vertical float, then you have to adjust it from the side. A faulty toilet flapper or flush valve tube may cause a phantom flush. So if the water level is too low or high, check the water level mark on the flush valve.
Step 5: Check the toilet tank’s float height
If the water level in the tank is rising too high or too low, it’s a problem that you need to fix by adjusting the float. The float of a toilet tank features a ball and a float arm at the top of the fill valve. The float’s height is decided by the water level that remains in the tank after it refills. If the ball is not faulty, it should be at the water level. Therefore, if it’s high or low, you should adjust it, and when you refill the tank, check to ensure the water level is at its designated level.
You can inspect if the float is okay by shaking it. If you hear water shaking inside, your float has to be replaced. Call a plumber or acquire a new float and replace it.
Step 6: Adjust the float’s height
Use a screwdriver to adjust the float’s height. You will find a screw at the top of the toilet fill valve. Start turning the screw counterclockwise in one full rotation. Note that clockwise will raise the water level while counterclockwise will lower it.
Related article: Seven Easy Steps to Clean Your Toilet Properly
Step 7: Flush and check the water level
Next, turn on the shutoff valve at the back of the toilet and let the tank refill. After the tank has been refilled, check the water level and ensure that it reaches the recommended height. If the water is not at the right level, you can empty the tank again and repeat the same process.
How to correct the water level in a toilet with a cylinder float
Step 1: Identify the cylinder float
Most new toilets are coming with cylinder floats/cup floats instead of ball floats. A cylinder is fitted to the fill valve shaft. These are easier to adjust than ball floats. Besides, performing maintenance on these floats is a lot easier than on ball floats. You can twist the stem clockwise or counterclockwise to raise or lower the water height to adjust the cylinder float.
Step 2: Remove the tank lid
Remove the toilet tank’s lid and place it on a rag or newspaper. Check the water level inside the tank and ensure it’s 1 to 2 inches below the toilet fill valve and overflow tube. If not, adjust it.
Step 3: Turn the water supply line off
If the water in the toilet stops or starts running, identify the shutoff valve at the back of your toilet to turn off the water supply properly. Turn the knob clockwise to lock it. Now you can flush your toilet and adjust the cylinder float in your toilet tank.
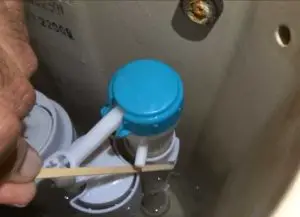
Step 4: Identify the adjustment stem
Find the adjustment stem in the toilet tank. The stem is a long and slender tube that links to the larger fill valve. In some toilets, it runs parallel to the valve or extends horizontally out from the top. This part is utilized to increase or decrease the level of water in the tank.
Step 5: Locate the release clip on the float
Some cylinder floats can be adjusted by squeezing a release clip on the float itself and adjusting the height to a lever you prefer. When you raise the dial, the water level will rise, and lowering it will make the water level lower.
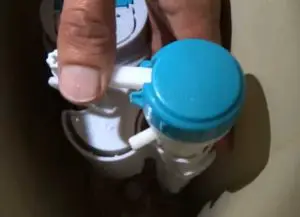
Step 6: Adjust the toilet float cylinder
If your toilet doesn’t feature a release clip, you will have to look for the dial. It’s usually connected to the end of the stem. Use your two fingers to hold the notched dial. Next, turn the stem clockwise to lower the height or counterclockwise to raise it. When you attain the right height for the cylinder float, return the toilet lid.
Step 7: Flush properly and check the water level
Test the float level after you have adjusted it. Flush the toilet and observe whether the water level fills to the right height. If the water is still not level, repeat the process and adjust the float again.
Ball Valve vs. Fill Valve for better float control
| Compare | Ball Valve | Fill Valve |
| Installed in: | Traditional Toilets | Modern Toilets |
| Size: | Big | Compact |
| Cistern: | Large | Small |
| Space Required: | More | Less |
| Noise Level: | High | Low |
| Water Usage: | High | Low |
Different Types of Ballcock to Control the Float:
- Plunger or Piston Ballcock
- Diaphragm Ballcock
- Float-cup Fill Valve
- Floatless Fill Valve
Summary
If the tank or bowl’s water level is lower or higher than the recommended level, you need to adjust the toilet float. Adjusting your toilet’s float is very easy if you know how your toilet’s system works. First of all, you should define if your toilet float is made of a ball float or a cylinder/cup float. With our step-by-step guide above, you should be able to adjust a toilet float.
Hi, this is Robert Crossan, the owner of this website, has 17 years of experience in the installation, maintenance, and repair of toilets and plumbing systems. After completing the Level 2 Basic Plumbing course in 2005, I started working in both domestic and commercial buildings as a professional plumber. So I can figure out the core difference between different toilet models and brands. It also helped me monitor their work performance and setbacks.