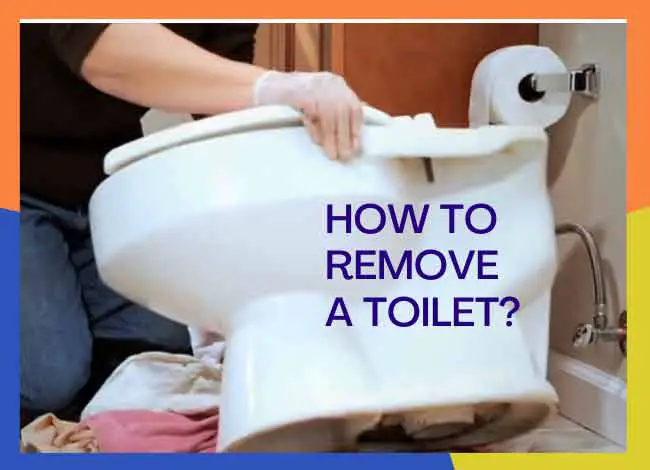
Before you can begin learning how to remove a toilet, the most important step is preparation. A successful DIY project starts with the right mindset, the right tools, and a clean working area. Skipping preparation often leads to water spills, broken parts, or even damage to your bathroom floor.
Clear the Area
Start by removing rugs, bathmats, or any accessories around the toilet. The process will get messy, so giving yourself space to work is essential. Lay down old newspapers or a plastic sheet around the base of the toilet to catch any water or debris.
Gather the Right Tools and Materials
Having all your supplies within reach ensures you won’t have to pause mid-task. For toilet removal, you’ll typically need:
- Adjustable wrench or pliers – to loosen nuts and bolts.
- Flathead screwdriver – useful for popping off bolt caps and prying.
- Hacksaw – in case bolts are corroded and difficult to remove.
- Bucket and sponge or rags – to soak up leftover water.
- Rubber gloves and safety glasses – for hygiene and safety.
- Putty knife – to scrape off caulk and old wax rings.
- Towels or cardboard – to rest the tank or bowl on once removed.
You’ll also need replacement items such as a new wax ring, toilet bolts, Teflon tape, and potentially a toilet flange repair kit in case the flange shows signs of wear.
Safety Precautions
Always wear gloves to protect your hands from bacteria, rust, or sharp edges. If you’re working with a one-piece toilet, consider asking for help when lifting—it can be heavy and awkward to move on your own.
Turning Off the Water Supply
One of the most critical steps in learning how to remove a toilet is making sure no water remains in the system. If you skip this stage, you’ll likely end up with water spills all over your bathroom floor.
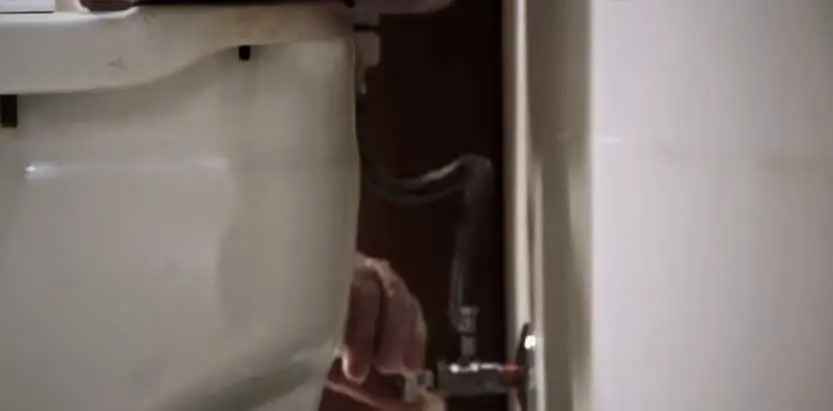
Locate the Shutoff Valve
Behind or to the side of your toilet, you’ll find a small knob or lever attached to the water supply line. This is the shutoff valve. Turn it clockwise until it stops. This cuts off the water flow to the tank.
Drain the Tank and Bowl
Once the valve is off:
- Flush the toilet to empty as much water as possible.
- Hold down the handle to drain the tank completely.
- Use a sponge or rag to soak up any remaining water at the bottom of the tank.
For the bowl, you can use a small container or sponge to remove leftover water. A wet/dry vacuum is also a convenient option if you have one.
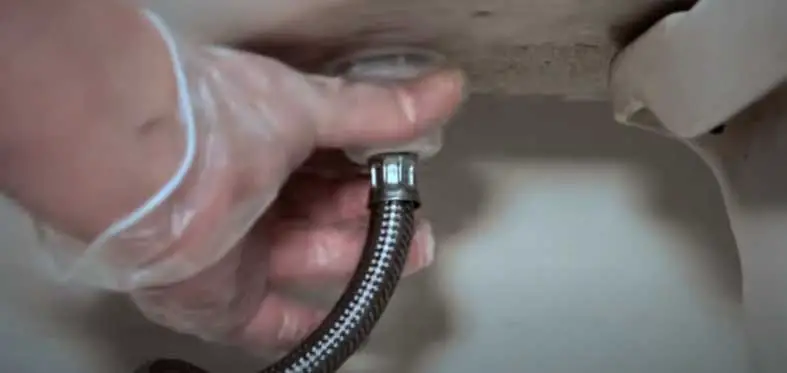
Disconnect the Water Supply Line
Next, place a bucket or towel underneath the connection point, then use your wrench to loosen the nut attaching the supply line to the tank. Some water may drip out, so be prepared.
Related article: Solve toilet clog problem with some easy steps
Detaching the Tank and Bowl
Now that the water supply is shut off and the toilet is drained, the next stage in learning how to remove a toilet is detaching the tank and the bowl. This step requires patience, as old bolts can often be rusted or stuck.
Removing the Toilet Tank
- Take off the tank lid carefully and place it somewhere safe—it’s fragile and can crack easily.
- Locate the bolts inside the tank that connect it to the bowl. These are usually secured with nuts on the underside.
- Use a screwdriver for the top and a wrench for the nuts underneath to loosen them.
- If the bolts are rusty and difficult to remove, spray a little penetrating oil and wait a few minutes. For severely stuck bolts, you may need a hacksaw to cut them off.
- Once loose, lift the tank straight upward and set it on towels or cardboard to avoid damaging your floor.
⚠️ Note: This step applies to two-piece toilets (with separate tank and bowl). If you have a one-piece toilet, the tank and bowl are combined, so you’ll skip this step and move directly to loosening the bowl.
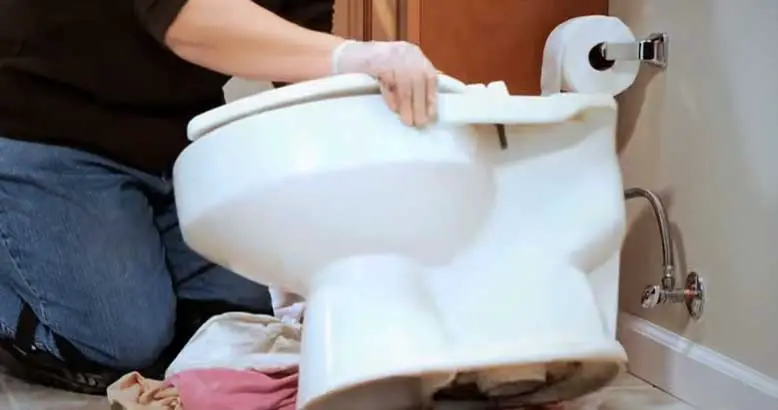
Removing the Toilet Bowl
- Pry off the decorative plastic caps at the base of the toilet using a flathead screwdriver.
- Underneath, you’ll see the floor bolts that secure the toilet to the flange. Use a wrench to loosen the nuts.
- If the nuts are rusted and refuse to turn, once again, a hacksaw can be used to carefully cut through the bolts.
- Rock the bowl gently from side to side to break the wax seal.
- Lift the bowl straight up and place it on a towel, blanket, or cardboard.
Pro Tip: Toilets can be heavier than they look. For a one-piece toilet, always have someone help you lift—it can weigh 70–120 pounds.
At this point, you’ve successfully separated the tank and bowl from the floor. You’re now ready to move to the more challenging part: breaking the caulk seal and preparing the base for the next installation.
Breaking the Seal and Handling Stubborn Fixtures
By now, the tank and bowl are detached, but your work isn’t finished yet. The next step in how to remove a toilet is breaking the seal that keeps the base attached to the floor and dealing with any stubborn hardware that refuses to budge.
Related article: Follow these easy steps to remove hard water stains
Cutting Through the Caulk or Sealant
Most toilets are sealed to the floor with caulk or silicone to prevent water leaks and provide extra stability. This can make the bowl feel stuck even after bolts are removed. To release it:
- Take a putty knife or utility knife.
- Carefully cut along the base of the toilet where it meets the floor.
- Work your way around the entire toilet base until the seal breaks.
Once the caulk is loosened, gently rock the bowl from side to side. This helps break any remaining bond between the toilet and the floor.
Dealing with Stubborn Bolts
Sometimes, floor bolts are so corroded that they refuse to move. Here’s how to handle them:
- Penetrating oil: Spray the bolts and let them sit for 10–15 minutes before trying again.
- Locking pliers: Give yourself more grip by clamping down tightly.
- Hacksaw method: If all else fails, cut the bolts flush with the floor to release the toilet.
Lifting the Bowl Free
After cutting through the caulk and handling the bolts, carefully lift the toilet bowl straight up. Avoid twisting it too much, as porcelain can crack easily. Place it on a towel, blanket, or cardboard to protect your bathroom floor.
Pro Tip: If the toilet feels too heavy, remove the toilet seat and lid first to reduce some weight before lifting.
At this point, your old toilet is completely separated from the floor. Next, you’ll need to seal off the drain opening and prepare the area for cleanup and installation.
Sealing the Drain and Preparing the Flange
Once the toilet bowl has been lifted away, you’ll see an exposed drain hole in the floor. This is where your toilet connects to the sewer line. At this stage of how to remove a toilet, sealing off that opening is extremely important to prevent foul sewer gases from escaping into your bathroom.
Seal the Drain Opening
- Immediately place a large rag, old towel, or sponge into the drain hole. This creates a temporary block against odors.
- For extra protection, you can also use a rubber test plug, which is designed to fit snugly inside the pipe and block gases more effectively.
⚠️ Warning: Do not use small cloths or rags that can accidentally slip down into the sewer line. This can create a blockage and future plumbing headaches.
Removing the Old Wax Ring
Every toilet sits on a wax ring that seals the connection between the bowl and the flange. Once the toilet is removed, this ring must be replaced—reusing it is never an option.
- Take your putty knife and scrape away the sticky, messy wax completely.
- Wipe the area clean with a rag or paper towels.
- Discard the old wax in a sealed plastic bag to keep odors contained.
Inspecting the Flange
The toilet flange is the circular fitting that connects your toilet to the drainpipe. After scraping away the wax, check the flange carefully for:
- Cracks in the plastic or metal.
- Rust, corrosion, or broken screw slots.
- Signs of looseness or instability.
If the flange is damaged, you’ll need to repair or replace it before installing a new toilet. Fortunately, most hardware stores now carry toilet flange repair kits that make fixing a broken flange much easier than in the past.
Updated Tip (2026): Many homeowners now prefer wax-free toilet seals made from rubber or foam. They’re easier to work with, reusable if you need to reposition the toilet, and less messy than traditional wax rings.
At this point, you’ve successfully sealed the drain, removed the old wax ring, and inspected the flange. Your bathroom is now prepared for the final step: disposing of the old toilet and getting ready for a fresh installation.
Disposing of the Old Toilet
Toilets are bulky, heavy, and made of porcelain, which makes disposal tricky. Here are the most common options:
- Municipal Disposal Services: Many local waste management services accept old toilets. Check your city’s website for rules—some require you to remove the toilet seat and handle before pickup.
- Recycling Programs: Increasingly popular in 2026, many communities have toilet recycling programs. Porcelain is crushed and repurposed into materials like road base or landscaping aggregate.
- Donation (if in good condition): If your old toilet still functions and is crack-free, some non-profits, like Habitat for Humanity, may accept it for reuse.
⚠️ Tip: Never throw a toilet directly into a regular trash bin—it’s too heavy and can damage collection equipment. Always follow your municipality’s guidelines.
Cleaning the Work Area
Once the toilet is out, your bathroom will likely look messy. To finish properly:
- Remove the rag or plug from the drain briefly to check for airflow, then reseal until the new toilet is installed.
- Use a disinfectant cleaner to wipe down the floor and surrounding area.
- Scrub away any leftover caulk or residue from the toilet base area.
This not only makes installation easier but also ensures a hygienic foundation for your new fixture.
Preparing for Installation
At this point, your bathroom is ready for the next phase. Before installing the new toilet, make sure you have:
- A new wax ring or wax-free seal.
- New flange bolts to secure the base.
- Teflon tape for the water supply connection.
- A helper if you’re installing a one-piece toilet.
Eco-Friendly Update (2026): If you’re upgrading, consider replacing your old toilet with a high-efficiency or dual-flush model. These modern toilets use significantly less water—often as little as 1.28 gallons per flush—helping you save on bills while conserving resources.
Final Thoughts: Mastering How to Remove a Toilet
By following these steps, you’ve learned exactly how to remove a toilet safely and efficiently. From preparation and shutting off the water to lifting the bowl, sealing the drain, and cleaning the workspace, the process is straightforward once broken down into stages.
Not only does this save you the cost of hiring a plumber, but it also gives you valuable DIY experience. Best of all, it prepares your bathroom for a fresh, modern upgrade that will improve comfort, hygiene, and efficiency.
So the next time your old toilet leaks, stains, or simply looks outdated, don’t hesitate—you now know how to remove a toilet like a pro.
Hi, this is Robert Crossan, the owner of this website, has 17 years of experience in the installation, maintenance, and repair of toilets and plumbing systems. After completing the Level 2 Basic Plumbing course in 2005, I started working in both domestic and commercial buildings as a professional plumber. So I can figure out the core difference between different toilet models and brands. It also helped me monitor their work performance and setbacks.