Have you ever tried to replace or repair a toilet tank part, only to discover that the plastic lock nut is completely stuck?
It’s one of the most frustrating situations you can face while maintaining your bathroom. The toilet is one of the most used fixtures in your home — you literally can’t go a single day without it. So, when something as small as a stuck lock nut causes a problem, it quickly becomes a big headache.
Fortunately, you don’t always need to call a plumber. With the right tools and a little patience, you can easily remove a stuck plastic nut from your toilet tank by yourself.
In this article, we’ll explain everything — from what a toilet lock nut actually does, to how to safely loosen and remove it without damaging your toilet.
What Is a Toilet Lock Nut and Why Is It Important?
Before learning how to remove it, it’s important to understand what a toilet lock nut actually is and why it’s there.
A lock nut in your toilet tank is a plastic or sometimes metal nut that holds certain internal components securely in place. Typically, it connects the fill valve (or sometimes the flush valve) to the bottom of the tank. This nut ensures that water doesn’t leak through the joint and that the tank maintains a tight, watertight seal.
Here are the main purposes of the lock nut:
- Secures the fill valve or flush valve to the tank base
- Prevents leaks from the bottom of the tank
- Holds fixtures firmly in place, so they don’t loosen due to water pressure or vibration
- Allows easy disassembly during repairs or part replacements
In most modern toilets, the nut is made of durable plastic, which prevents rust and corrosion. However, over time it can become brittle, overtightened, or jammed with mineral deposits, making it difficult to remove.
You’ll usually need to remove this nut when:
- You’re replacing the fill valve or flush valve
- The tank is leaking from the bottom
- You’re installing a new toilet or moving the old one
- You want to adjust or clean parts inside the tank
Common Reasons Why the Lock Nut Gets Stuck
If you’ve ever wondered why the plastic nut under your toilet tank refuses to budge, here are some likely causes:
-
Overtightening during installation:
Sometimes plumbers or DIY installers overtighten the nut to stop leaks, which makes it nearly impossible to remove later without special tools. -
Age and wear:
Plastic becomes brittle over time due to constant exposure to water and temperature changes, causing it to seize up or crack. -
Mineral deposits (calcium or lime buildup):
Hard water can leave calcium deposits around the threads, bonding the nut to the metal or plastic surface. -
Cross-threading:
If the nut wasn’t installed straight, it may have been cross-threaded, making it jam in place. -
Rust or corrosion (if metal washers are nearby):
Even though the nut itself is plastic, nearby metal parts may corrode and create friction that locks it in place. -
Use of sealing materials like Teflon tape or plumber’s putty:
Sometimes excessive tape or sealant around the threads hardens over time, gluing the nut in place.
Knowing the cause helps you choose the right removal method — without breaking anything.
Tools You’ll Need to Remove a Stuck Plastic Toilet Nut
Before you start, gather the following tools and materials. Having them ready will make the process much smoother:
-
Adjustable wrench or channel-lock pliers
-
Towels or old rags
-
A small bucket or bowl
-
Hot rag or hair dryer (for heating)
-
Penetrating oil, WD-40, or silicone grease
-
Calcium/lime dissolver (optional)
-
Flathead screwdriver
-
Safety goggles and gloves
-
Angle grinder (only as a last resort)
Step-by-Step Guide: How to Remove a Stuck Plastic Lock Nut from a Toilet Tank
Let’s go through the process step by step. Take your time and follow each step carefully to avoid cracking the tank or damaging the fill valve.
Step 1: Turn Off the Water Supply
Always start by turning off the water supply valve.
You’ll find this valve behind or near the toilet, where the flexible hose connects to the wall. Turn the handle clockwise to shut off the water.
Once the supply is off, flush the toilet once to remove as much water as possible.
Step 2: Drain the Toilet Tank Completely
Next, remove the tank lid and gently set it aside on a soft surface to avoid cracks.
Press down the flush handle and hold it until no more water comes out. If a small amount remains at the bottom, use a sponge or towel to soak it up.
Draining the tank ensures a clean, dry workspace and prevents messy spills later.
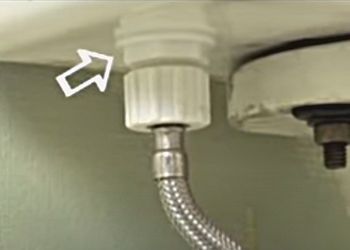
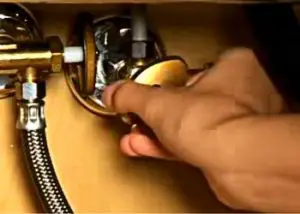
Step 3: Locate the Plastic Lock Nut
Look underneath the tank. You’ll see the water supply hose connected to the tank’s bottom with a plastic coupling.
Unscrew that coupling first (use your hands or pliers if it’s tight). Once removed, you’ll see a large plastic nut holding the fill valve to the tank — that’s the lock nut you need to remove.
Step 4: Try to Loosen the Nut by Hand
Before using any tools, always attempt to loosen the nut by hand.
Grip it firmly and turn counterclockwise (to the left).
If it moves, great — you can remove it easily.
If not, don’t force it too much — forcing can crack the nut or even break the tank base.
Step 5: Use Pliers or an Adjustable Wrench
If the nut doesn’t move by hand, try using adjustable pliers or a wrench.
Wrap a towel or rag around the nut to protect it from scratches, then gently turn the wrench counterclockwise.
Apply slow, steady pressure — jerking motions may break the plastic.
If it still won’t move, move on to loosening methods below.
How to Loosen a Stuck or Over-Tightened Plastic Lock Nut
If the nut is too tight or fused due to age or mineral buildup, here are several proven methods to loosen it safely.
1. Apply Grease or Penetrating Oil
This is the most common and plumber-approved method.
Use a small amount of silicone grease, WD-40, or penetrating oil on the nut’s threads.
Let it sit for 10–15 minutes to allow the lubricant to penetrate and loosen the joint.
Afterward, wipe away excess and try again with your wrench or pliers.
You’ll often find that the nut comes loose quite easily after lubrication.
2. Use Heat (Hot Rag or Hair Dryer Method)
Heat can help soften and expand the plastic slightly, making it easier to remove.
-
Soak a rag in hot water and wring it out.
-
Hold the hot rag over the nut for about 5–7 minutes.
-
Alternatively, you can use a hair dryer on a medium heat setting to warm up the nut gradually.
Once it’s warm, try turning it again with a wrench or pliers. Avoid using open flames or extreme heat, as that could warp or melt the plastic.
3. Try Locking Pliers
If regular pliers aren’t gripping properly, use locking pliers (Vise-Grips).
Adjust them so they tightly fit around the nut, lock them in place, and apply steady pressure.
Move your hand from top to bottom or side to side — whichever gives better leverage.
If necessary, use both hands for a firm grip. Sometimes, a small vibration or rocking motion helps break the seal.
4. Dissolve Mineral Deposits with Calcium Remover
If you live in an area with hard water, the nut may be stuck because of calcium or lime buildup.
Apply a calcium/lime dissolver (such as CLR) around the base of the nut.
Let it sit for 10 minutes to soften the deposits, then wipe it off and try turning again.
In most cases, this method works surprisingly well.
5. Use a Flathead Screwdriver for Gentle Leverage
If the nut has loosened slightly but won’t fully turn, insert a flathead screwdriver under one side of the nut and gently twist to apply leverage.
Be very careful not to press too hard against the ceramic surface — it can crack easily.
This method is great for giving a little extra push to already loosened nuts.
6. The Last Resort: Use an Angle Grinder
If every method fails and the nut is completely fused or deformed, your final option is to cut it off.
This should be done only as a last resort and with extreme caution.
You’ll need:
-
An angle grinder or rotary tool
-
Safety goggles
-
Work gloves
-
Flathead screwdriver
Steps:
-
Put on your gloves and goggles for safety.
-
Use the grinder to carefully slice through one side of the nut — do not cut too deep.
-
Stop as soon as you reach near the threads.
-
Insert a flathead screwdriver into the cut and twist gently to split the nut into two halves.
-
Remove the broken pieces by hand.
Avoid damaging the fill valve threads or the tank bottom during this process.
Safety Tips When Removing the Nut
-
Never use excessive force; patience is key.
-
Avoid hammering the nut — it can crack the tank.
-
Always turn counterclockwise to loosen.
-
Wear rubber gloves to get a better grip and prevent hand injuries.
-
Keep towels and a bucket nearby to catch any water drips.
-
If you use chemicals or dissolvers, ensure the bathroom is well-ventilated.
After Removing the Nut: What’s Next?
Once the nut is off, inspect the fill valve or flush valve and its rubber washer.
If the washer is old or cracked, replace it to prevent future leaks.
Clean the area around the hole at the bottom of the tank with a rag or soft brush to remove any mineral residue.
When reinstalling:
-
Place the fill valve through the hole in the tank.
-
Tighten the new plastic nut hand-tight only — do not overtighten.
-
Reconnect the water supply hose.
-
Turn the water back on and test for leaks.
If everything looks good, replace the lid and flush to ensure the system is working perfectly.
Preventing a Stuck Plastic Nut in the Future
Once you’ve fixed the issue, it’s worth taking a few steps to ensure it doesn’t happen again:
-
Hand-tighten only: Don’t overtighten when installing.
-
Apply a thin coat of plumber’s grease on the threads before tightening.
-
Check for leaks regularly so you don’t have to re-tighten later.
-
Avoid using metal tools directly on plastic nuts.
-
Clean mineral deposits inside the tank every few months using vinegar or mild cleaner.
By following these preventive measures, you can make future repairs much easier.
Conclusion
A plastic lock nut stuck in a toilet tank may seem like a small issue, but it can quickly turn into a major inconvenience.
The good news is — you can often solve it yourself without needing a plumber.
Whether you use grease, heat, or gentle pressure with pliers, the key is patience and care.
Never rush or force the nut, as this can damage the tank or the valve threads.
By understanding how the lock nut works and following these steps carefully, you’ll be able to remove even the most stubborn nut — safely, effectively, and without breaking anything.
Hi, this is Robert Crossan, the owner of this website, has 17 years of experience in the installation, maintenance, and repair of toilets and plumbing systems. After completing the Level 2 Basic Plumbing course in 2005, I started working in both domestic and commercial buildings as a professional plumber. So I can figure out the core difference between different toilet models and brands. It also helped me monitor their work performance and setbacks.